 I knew this guy who kept his dice in a plastic bag. I mean, he was nice enough, I guess, but you should have seen the side eye when he dropped that thing on the table. Because really, who takes all those gorgeous, carefully inked, painstakingly coordinated polyhedral gems and stuffs them into a sandwich bag like they’re Velveeta on Wonder Bread?
Don’t be that guy.
You deserve better. Your dice deserve better. Your dice deserve to be stored and transported in a style that reflects your personality and good taste. You need something that not only contains your dice, but celebrates them with pride.
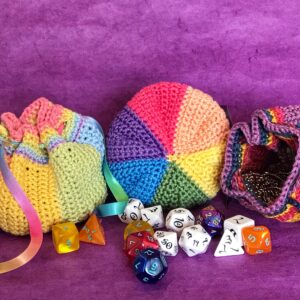
This handcrafted, multicolored dice bag is just what you’re looking for. Crocheted with 100% cotton, it’s sturdy enough to protect your dice while you’re on the road to your next dungeon adventure, but soft enough to cushion them from wear and tear on the way. It features a secure, double-loop drawstring closure to keep your babies tucked safely inside.
With the prismatic drawstring dice pouch, you can hold:
- 60 standard RPG dice
- 170 glass game tokens
- 50 gold pieces
- 32 ounces of random treasure
- 8 Mint Milano cookies
- 2 1/2 servings of Goldfish crackers
Materials List
- Hook(s): US G/6 (4.0 mm)
- Yarn: Scheepjes Catona [100% mercerized cotton]
- Colors & Approx Yardage: See Notes.
- Notions: Yarn needle, stitch markers
Size and Gauge:
Not necessary for this pattern
Skill Level: Easy
Notes:
While this pouch could be made with any yarn and appropriate sized hook, I prefer a finer yarn like Catona because it makes thinner, more flexible fabric. Cotton yarn is less likely to stretch, too, so when you stuff your pouch full of dice, it won’t get distorted as easily.
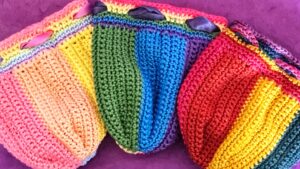
This pouch is constructed of six individual panels, which means you can easily change colors with each panel, offering nearly infinite color combinations. For the top section, you can either do a single color throughout, or switch colors at the beginning of every round or every other round, whatever suits your fancy. It’s also great for using up scraps.
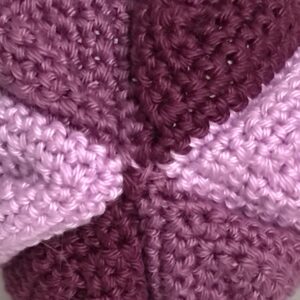
It’s recommended that you use a stitch marker in the center stitch of each panel row and leave it in place when you complete the panel. This will make it easier to ensure you are joining new panels in the correct place.
Drawstrings can be replaced with icord, ribbons, leather or other stringy-thing you like.
 Crochet Abbreviations (US terms):
- Chain (Ch / ch)
- Slip Stitch (sl st)
- Single Crochet (SC)
- Skip (sk)
- Stitch(es) (st / sts)
FIRST PANEL
Ch 21
1: SC in 2nd ch from hook, SC in next 18 chs; 3 SC in first ch of starting chain, then 19 SC in bottom loop of starting chain. Ch 1 and turn.
2: SC in 20 sts, 3 sc in next st, SC in 20 sts. Ch 1 and turn.
3: SC in 21 sts, 3 sc in next st, SC in 21 sts. Ch 1 and turn.
4: SC in 22 sts, 3 sc in next st, SC in 22 sts. Ch 1 and turn.
5: SC in 23 sts, 3 sc in next st, SC in 23 sts. Ch 1 and turn.
6: SC in 24 sts, 3 sc in next st, SC in 24 sts. Ch 1, 10 SC along top edge of the panel, finish off
SECOND THROUGH FIFTH PANEL
Ch 21
1: SC in 2nd ch from hook, SC in next 18 chs; 3 SC in first ch of starting chain, then 19 SC in bottom loop of starting chain. Ch 1 and turn.
2: SC in 20 sts, 3 sc in next st, SC in 20 sts. Ch 1 and turn.
3: SC in 21 sts, 3 sc in next st, SC in 21 sts. Ch 1 and turn.
4: SC in 22 sts, 3 sc in next st, SC in 22 sts. Ch 1 and turn.
5: SC in 23 sts, 3 sc in next st, SC in 23 sts. Ch 1 and turn.
6: Join last side of previous panel with first side of current panel with SC in 24 sts. In current panel only: 3 sc in next st, SC in 24 sts. Ch 1, 10 SC along top edge of the panel, finish off.
 SIXTH PANEL
Ch 21
1: SC in 2nd ch from hook, SC in next 18 chs; 3 SC in first ch of starting chain, then 19 SC in bottom loop of starting chain. Ch 1 and turn.
2: SC in 20 sts, 3 sc in next st, SC in 20 sts. Ch 1 and turn.
3: SC in 21 sts, 3 sc in next st, SC in 21 sts. Ch 1 and turn.
4: SC in 22 sts, 3 sc in next st, SC in 22 sts. Ch 1 and turn.
5: SC in 23 sts, 3 sc in next st, SC in 23 sts. Ch 1 and turn.
6: Join last side of previous panel with first side of current panel with SC in 24 sts; 3 sc in next st. Join last side of current panel with first side of first panel with SC in 24 sts. Ch 1, 10 SC along top edge of the panel, finish off10 SC along top edge of the panel.
Stitch the bottom of the pouch together.
 TOP OF POUCH
Work in non-continuous rounds. In round 4, you will create spaces for the drawstrings.
1: SC into the SC made at the top of each panel, for a total of 60 stitches. Join to first stitch and CH 1.
2 -3: Repeat round 1.
4: SC in 4 sts, CH 2, skip 2 sts . Repeat around. Join to first stitch and CH 1. You should have 10 spaces each 2 stitches wide.
5: SC around, with 2 SC in each 2-ch space made in previous round. Join to first stitch and CH 1.
6: Repeat round 1.
Finish off and weave in ends.
DRAWSTRINGS
CH 120 or longer. SS into 2nd ch from hook, then SS 118. Make two. Thread the laces through the pouch and secure the ends of each lace together.
Copyright 2022 Stace Dumoski